This blog was created to memorialize the building process of my Van's Aircraft RV-14 and to satisfy the requirements for certification in the Experimental Amateur Built Aircraft category. It will also serve as a central location for ME to reference in the future on processes and techniques I used during the build. Additionally, it will allow my family, friends, and other interested builders the opportunity to follow along during my build…..and might be helpful to someone along the way.
Alright, I started putting rivets into the Aft Fuselage assembly. First, I taped off the holes that DO NOT get rivets at this point. Those rivet locations are in the picture below under the orange tape.
The first two pieces to get riveted were the F-01408 Bulkhead and the F-01486E Stiffener. The plans called for all the rivets set tonight to be AN426AD3-3.5.....ALL 146 of them.
Here is the same piece looking aft.....
The next four pieces were the F-01407 Bulkhead, F-01486D Stiffener, F-01486C-R Stiffener, and the F-01486C-L Stiffener.
This is the same assembly looking forward.....
Here are a few additional pictures after all six pieces were riveted together.
I backriveted all 146 rivets so far on the assembly. I will need to use a bucking bar to rivet the Bellcrank Assembly to the Bottom Skin because the Battery Angles won't allow the Back Rivet Set to sit square on the rivet.
I disassembled the Aft Fuselage section I assembled yesterday. Like I previously posted, I wanted to get a visual of the pieces assembled together. Today, I started work on the F-01475 Top Skin. I started by completing the Alumiprep and Alodine work. After waiting for the Skin to dry, I applied the Akzo Epoxy Primer. Here is the Top Skin after the primer dried.
I mixed up enough Akzo to also prime the U-00018 Tail Spring Mount. Here is the Tail Spring after the primer dried.
As I have done with all of the other sections, I like to prime the rivet lines on the outsides of the Skin. Here is a shot of the F-01478 Bottom Skin after I primed the rivet lines.
There are four pieces that make up the Top Skin assembly.....The Top Skin, J-Stiffener, Upper Aft Fuse Rib, and the Skin Doubler. In the picture below, all four pieces are riveted together. I used the 3.5" Back Rivet Set for the rivets on the J-Stiffener, but due to clearance issues on the Fuse Rib, I had to use the 12" Set.
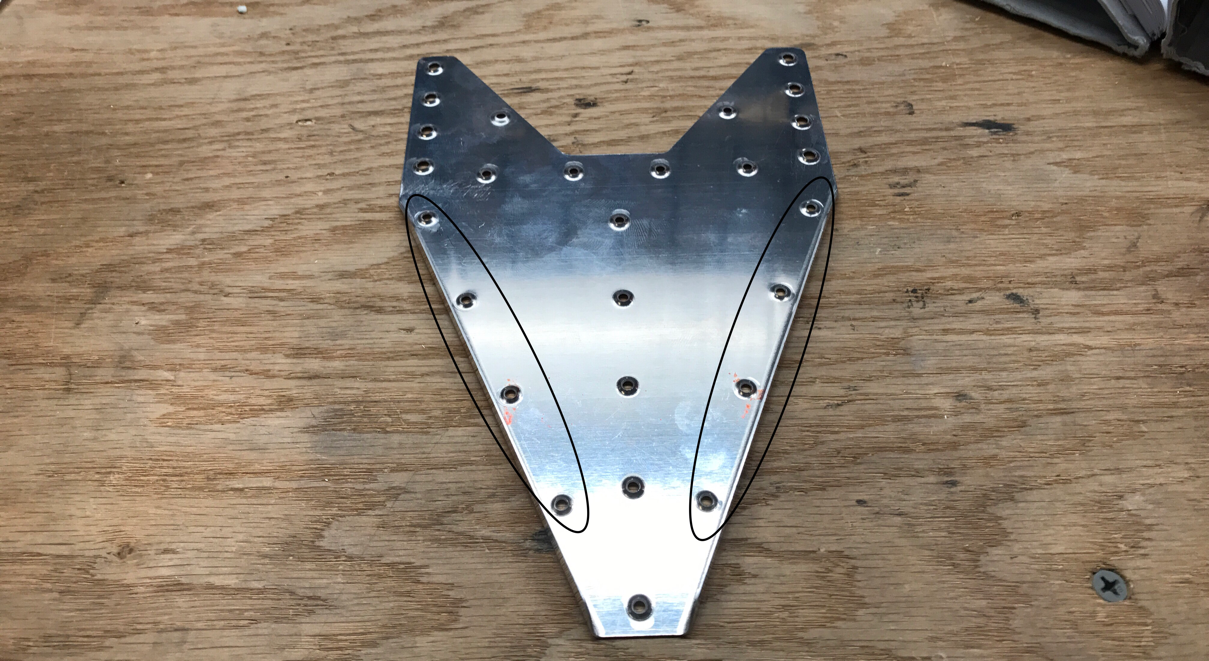
I did notice one "issue", if you want to call it that. The plans call for all 51 of the rivets to be AN426AD3-3.5 flush rivets. When I inserted the rivet into the one of the five holes circled below, it looked to short. I used a guage to confirm my belief, so I used 3-4 rivets for these five holes.
No real big physical progress today, but made great mental strides.....picture is worth a thousand words kinda thing. I'm almost to a point of making final assembly of the Aft Fuselage section (with rivets), so I wanted to cleco the section together to check the fit of all the pieces......and see something that resembles an airplane. Anyway, here we go.....
This is the left side of the fuselage with the Side Skin attached. Beginning at the front, you can see the F-01407 Bulkhead, the F-01408 Bulkhead, F-01409 Frame, F-01410 Bulkhead (front attach for the Horizontal Stabilizer), F-01411 Bulkhead (rear attach for the Horizontal Stabilzer), and the F-01412 Bulkhead.
This is a shot of the inside of the picture above.
Here is an overview of the Aft Fuselage Section looking forward.....
In this picture, I added the F-01474-L Top Side Skin.
And on the inside.....
By assembling these pieces, I was able to get a warm fuzzy on how the all fit together. Like I said, this was not required, but it gives me a better understanding of how everything will go together. I still need to prime the inside of the Side Skins and Top Side Skins, but tomorrow I will start installing rivets in Bottom Skin.
Machine Countersink, Machine Countersink, Machine Countersink! That was the task for this session. I completed the countersinking on the F-01418B-L and F-01418B-R Longerons to fit the dimpled Side Skins. There were 144 holes in each Longeron for a total off 288 countersunk holes. I will post some pictures of the completed Longerons tomorrow.
I still have some "optional" countersinking to complete because I decided to use flush screws on the F-14112 Plate Covers. I will complete this during the next session.
In Part 21, I completed the F-01473-L Side Skin. Tonight, I completed the F-01473-R Side Skin. I dimpled all the #40 and #30 (except as noted in the plans) and completed all the edge work. The -R Side Skin is now ready for Alumiprep, Alodine, and Akzo Primer. I don't have any pictures, but it looks just like he -L Side Skin from Part 21.
Next, I completed work on the F-01475 Top Skin. The work was pretty straight forward and fairly easily. I started by completing the edge work and making lap joints on the four edges. Then, all the #30 and #40 holes were dimpled. I was able to dimple most of the holes with the pneumatic and hand squeezer, but I needed to use the DRDT-2 for the row of holes in the center. The Top Skin is now ready for Alumiprep, Alodine, and Akzo primer.
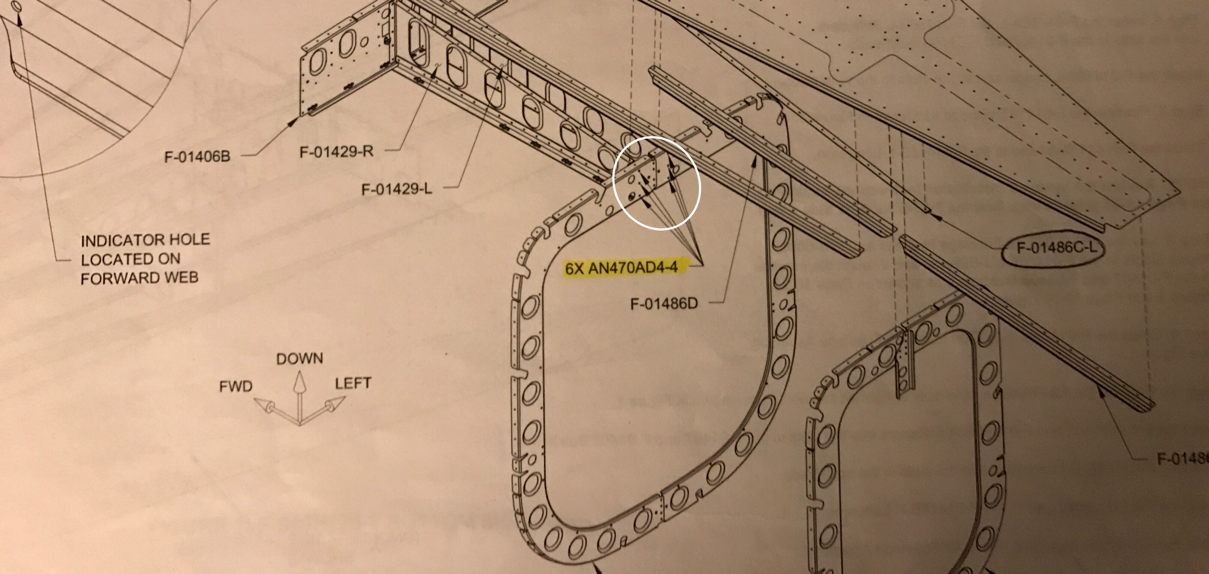
Today, I focused on the initial structure of the Aft Fuselage. The Battery Angle and Bellcrank Rib Assembly was riveted to the F-01407 Bulkhead in the area circled in the picture below. Six AN470AD4-4 universal rivets are used to connect the pieces.
There was a "small" issue with installing two of the rivets. The plans state, on several occasions, to place the manufactured heads of the rivets on the forward side of the assembly. The circled rivet in the picture below is not set, but just inserted into the hole. This rivet (and it's pain in the ass brother on the other side) could not be set as oriented in the picture. You would think the nutplate was in the way, but it's not. The problem is the shop head of the rivet by the circle. That rivet prevents the Cup Rivet Set or the Offset Cup Rivet Set from being square on the manufactured head.
So, I had to turn the rivet around in the other direct in order to set the rivet properly. This is not a big deal structurally.....cosmetically I guess, but it doesn't bother me.
One possible solution, if it really means that much, is to leave the rivet (the one in the way) out when the Battery Angles and Bellcrank Ribs are assembled. After the F-01407 Bulkhead is riveted, you can go back and do the last rivet in the Battery Angle. There is plenty of room to set that rivet.
The plans recommend you place the F-01478 Bottom Skin upside down across two sawhorses. I did this, but put the sawhorses on the work tables for height. That way, I can stand up when working under the assembly. Here is the F-01407 Bulkhead, F-01408 Bulkhead, F-01486C-L & -R, F-01486D, and F-01486E J-Stiffeners clecoed to the Bottom Skin.
Here is another view. At this point, the Bulkheads are only riveted at the bottom, so there is no support at the top. I used the orange tape to help support the Bulkheads until the Side Skins and additional Stiffeners are installed.
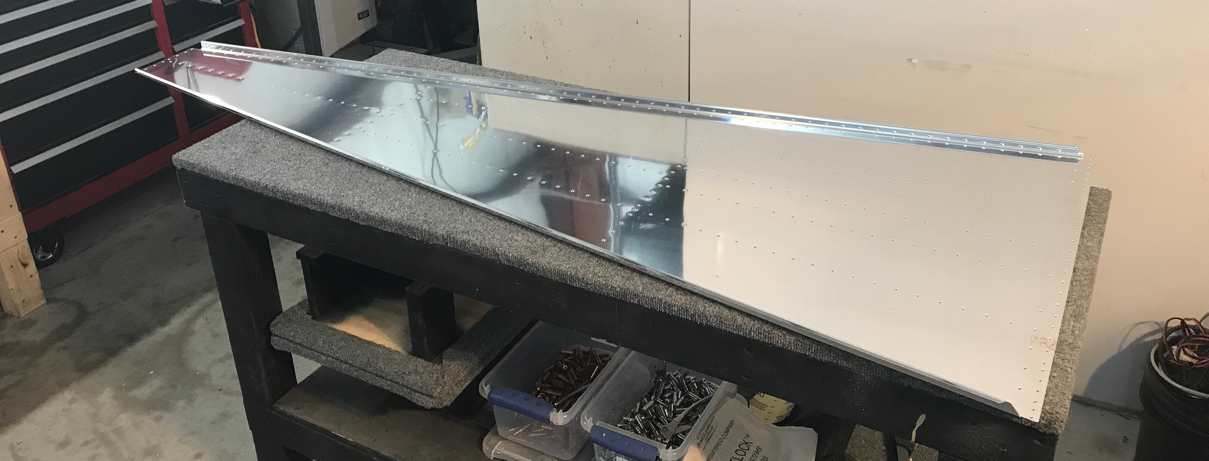
I'm going to wait for some help before I rivet the assembly together, so I started work on the F-01473-L Side Skin. I dimpled all the #40 holes and all the #30 holes (except specified in the plans). Pictured is the Left Side Skin and all I need to do is the edge work before priming.
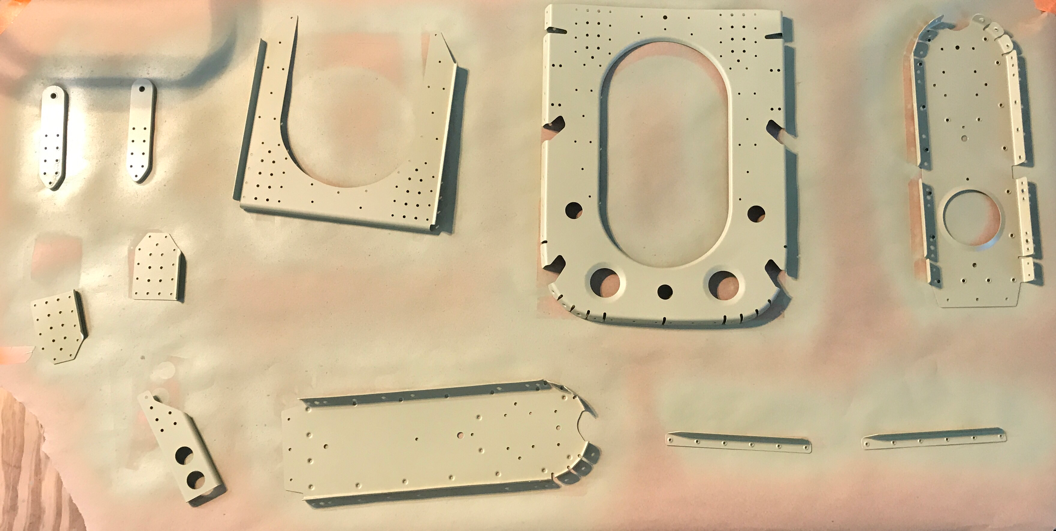
During today's session, I prepared the remaining parts (well, all but two--F-01418B-L and -R Longerons) with Alumiprep and Alodine. Then, all 18 pieces were Akzo Epoxy Primed. The first picture shows some of the pieces handing up to dry after being Alodined.
After all the Alumiprep and Alodine was completed, I started spraying the Akzo. Here is the first batch to get primed.....
The second "batch' was the F-01478 Bottom Skin.....
Here's the third batch.....
And finally, the fourth batch.
Now, I can start the official assembly of the Aft Fuselage tomorrow.
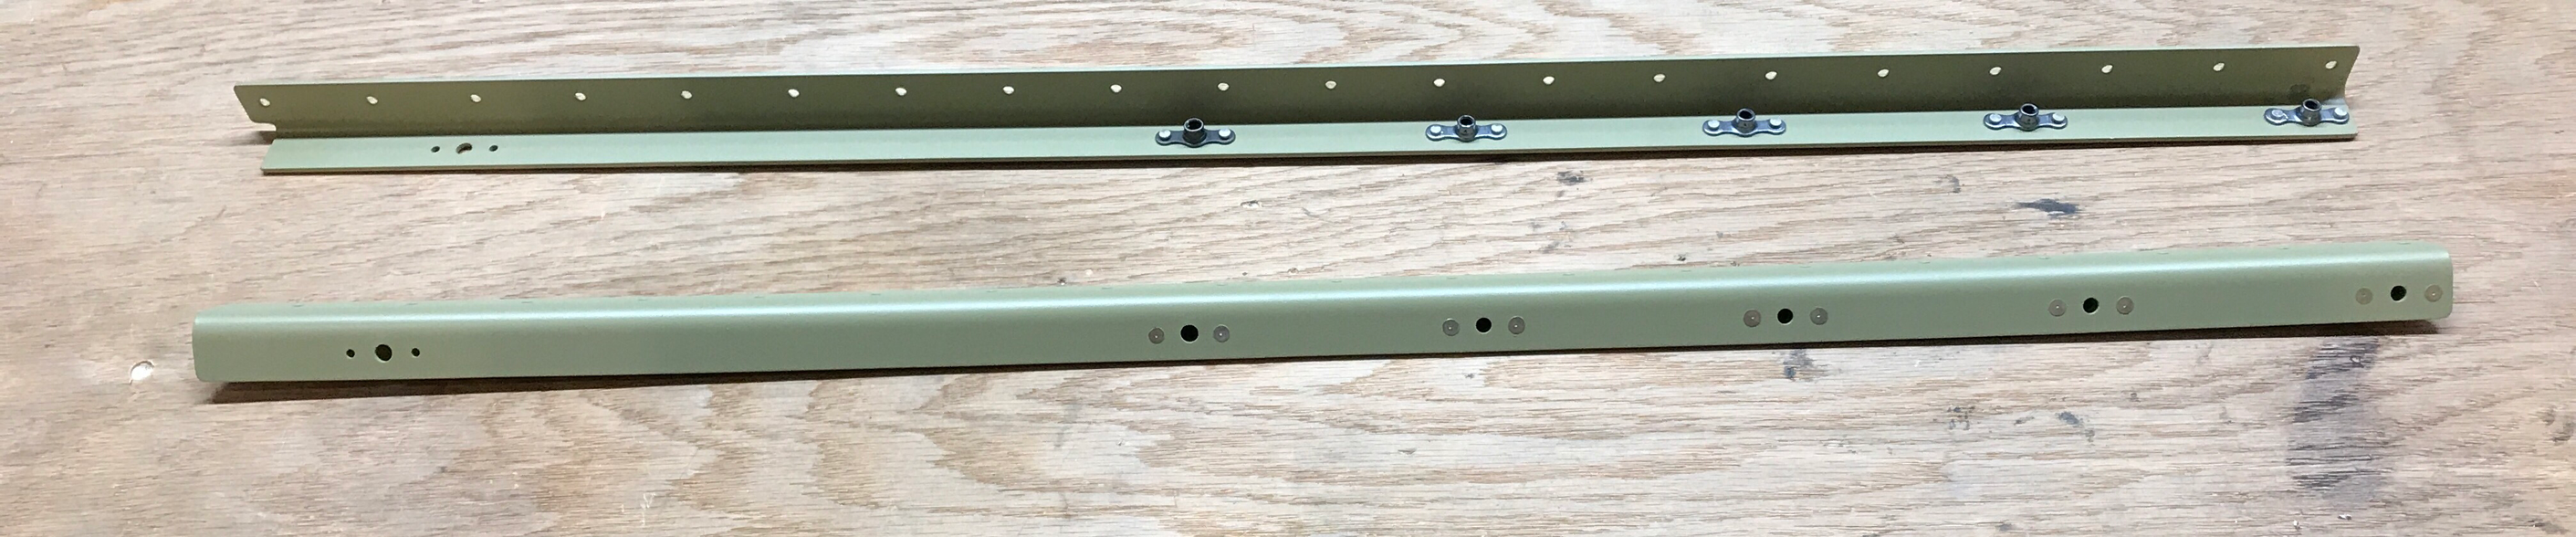
In Part 17, I prepared all the Stiffeners for the Aft Fuselage section......EXCEPT TWO OF THEM. The F-01486C-L and -R Stiffeners just didn't look right to me. Here is a picture of one of the Stiffeners. The pre-punched holes in both of the Stiffeners are actually in the J-Channel and NOT in the Flanges where they are supposed to be.
I called Van's and was told they knew about the problem and have fixed the errors in the pre-punching. Dale from Van's said he would send me two new F-01486C-L and -R Stiffeners and would make sure they went out the same day. A couple of days later the new Stiffeners arrived.....
Here is a comparison of the incorrectly pre-punched Stiffener (top) and the correctly pre-punched Stiffener (bottom). The new Stiffener shown below has also had the edge work and dimpling completed.
Here are both of the NEW completed Stiffeners ready for Alumiprep, Alodine, and Akzo Primer.
In Part 11, I started dimpling the F-01475A Skin Doubler. I was able to dimple all the #30 holes, but not the #40 holes near the edge (with a standard sized dimple die set). If I used a standard die, it would deform the bend in the edge of the Doubler. In order to prevent the deformation of the material, a reduced diameter dimple die would need to be used. So, I ordered one from Cleaveland Aircraft Tool. In the picture below, you can see the standard die on the left and a reduced diameter die on the right.
Here is what the two dies look like on the Doubler. The edge of the standard die touches the bend in the Doubler and would deform the bend during the dimpling process. The reduced diameter die is small enough to prevent any damage.
Here is a picture of the bottom of the Doubler after the #40 holes were dimpled (circled).
And the top side.
In Part 14, I started the riveting process of the bulkhead assembly below. I set the 18 AN470AD4-8 rivets with 1/8 cupped set and pneumatic squeezer. The same 1/8 cup set manufactured to set #4 universal rivets is to big for the heads of a 3/32 (#3) rivet. So, I ordered a smaller 3/32 (#3) cup set from Cleaveleand Aircraft Tool. After I received the cupped set in the mail, I finished setting the remaining AN470AD3-4 and AN470AD3-3.5 rivets in the bulkhead assembly.....as shown below.
The word of the day.....DIMPLING! Tonight was kind of a short session with seven more completed pieces. All of the #40 holes were dimpled in the seven Stiffeners. Two of the Stiffeners will not be completed tonight.....more on that in a later post.
I've been putting off completing the fabrication of the F-01411D Horizontal Stab Attach Bar Support Angle. Not necessarily for any specific reason, but just putting it off. Anyway, I completed the Attach Bar tonight. The Attach Bar is pictured below. The Bar needed to have some material trimmed off each edge and the "v" shape removed in the middle. I used a band saw to make the cuts.....worked very well. I then used the belt and hand sander on the edges to make the final shape. Additionally, I completed the remaining prep work on the Aft Deck and Deck Doubler. All three pieces are ready for Alumiprep, Alodine, and Primer.
Another very productive day at the hangar. I started today by installing the nine K1000-08D and two MS21055L08 (90 degree angled) nutplates to the F-01406B Bulkhead. Both types of nutplates accepted AN426AD3-3.5 flush rivets. The nutplates near the top edge of the Bulkhead were set with the hand squeezer. However, I need the pneumatic squeezer with the 3" yoke to reach the three in the middle.
After the nutplates were riveted, the F-01429-L & -R Bellcrank Ribs were riveted to the Bulkhead. The assembly used eight AN470AD4-4 universal rivets and two AN426AD4-4 flush rivets.
Next, all of the #40 holes in the F-01478 Bottom Skin were dimpled with the DRDT-2. I also completed all the edge work on the Bottom Skin. Here are a couple shots of the completed Skin.
Lots of progress today. I started today's session with Alumiprep, Alodine, and Priming. As seen in previous videos, I dipped the parts small enough to fit in the plastic bins and brushed the larger parts. After drying for a few hours, I started priming the parts. In the picture below, you can see all the parts handing up to dry.
Here is the first batch of parts to get primed. Pictured below (left to right) are the F-01410C Horizontal Stab Attach Bars, F-01410A Bulkhead, F-01410 Bulkhead, F-01412A Bulkhead, F-01410B Bulkhead Doublers, F-14115 Rudder Cable Bracket, F-01412B Bulkhead, and F-01473A Angle Stiffeners (x2).
The second batch of priming included the F-1037B & C Battery Angles, F-01429-L & -R Bellcrank Ribs, and F-14131 Upper Aft Fuselage Rib.
The last batch included the F-01406B Bulkhead and F-01409 Frame.
As I previously mentioned, I received the replacement F-01412A & B Bulkheads from Van's. These two pieces got primed in the first batch today. After the primer dried, I installed the AN426AD4-4 rivets as called out in the plans. The first picture below shows the aft side of the joined Bulkheads and the second shows the forward side......AND correct this time!!!!!
Next, I clecoed and riveted this assembly below. This Bulkhead assembly will be the forward attach point for the Horizontal Stabilizer. I installed the nine AN470AD4-8 universal rivets on each Horizontal Stab Attach Bars using the pneumatic squeezer. The five small AN470AD3-3.5 were installed with the hand squeezer. I still need to install 34 AN470AD3 universal rivets; however, I will need to order a 3/32 (#3) squeezer cup set. I have a 1/8 (#4) squeezer cup set, but it is too big for the rivet head of a #3 and will leave smilies. I'll have the new #3 squeezer set in a few days and will install the remaining rivets.
Each Battery Angle below has four K-1000-08 and one K1000-3 nutplates. This picture shows the upper and lower sides of the Battery Angles with the five nutplates installed.
Lastly, the Battery Angles were attached to the F-01429-L & -R Bellcrank Ribs using AN470AD4-4 universal rivets. This picture shows upper and lower angles of the finished product.